- Step 1: Create the app
- In Central Administration, in the Application Management section, click Manage web applications. In the Contribute group of the ribbon (upper menu), click New.
- In the Claims Authentication Types section of the Create New Web Application dialog box, select Enable Forms Based Authentication (FBA).
Type a membership provider name in ASP.NET Membership provider name and a role manager name in ASP.NET Role manager name.
For our tutorial type MyMembershipPro for the membership and leave the role manager empty. - Configure the other settings for this new web application as needed, and then click OK to create it.When prompted with the Application Created dialog box, click OK.

- Step 2: Create the site
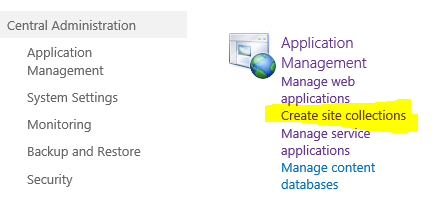
- In the Central Administration, Application Management click “Create site collections“
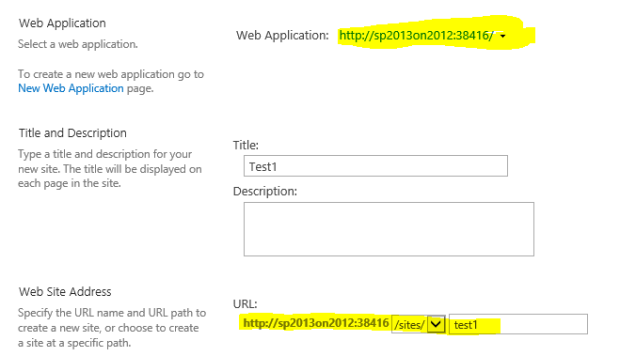
- Make sure you choose the port created in step 1 (in our example it is port 38416), also provide a URL (in our example it is test1). Also set administration user.
- Step 3: Integrating your custom membership compiled provider
- Compile your membership provider (for example: MyMembership : ActiveDirectoryMembershipProvider)
- Copy the compiled dll into your SharePoint machine
- Register the dll into the GAC by using command line gacutil.exe -i <yourdllname.dll>
- Make sure it is registered by using command line gacutil.exe -l
- Step 4: Updating the web.config
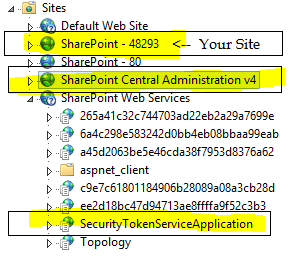
- You will need to update the web.config in three locations: SharePoint Central Administration v4, SharePoint Web Services\ SecurityTokenServiceApplication, Your share-point-site:
- Open IIS click your-sharepoint-site, click explore in the right-pane, open the web.config for edit
- Add in the system.web section a connection string . For example name it adconn (don’t foreget to update the parts appear in green):
<connectionStrings>

<add name="adconn" connectionString="LDAP://YourDomain.com/DC=YourDomain,DC=com" />

</connectionStrings> - In the system.web section add/update the membership section (don’t foreget to update the parts appear in green):
<membership defaultProvider="i">

<providers>

<add name="i" type="Microsoft.SharePoint.Administration.Claims.SPClaimsAuthMembershipProvider, Microsoft.SharePoint, Version=15.0.0.0, Culture=neutral, PublicKeyToken=71e9bce111e9429c" />

<add name="MyMembershipPro" applicationName="MyMembershipPro" type="YourCompiledProviderNameSpace.YourCompiledProviderClass, YourCompiledProviderDll, Version=1.0.0.0, Culture=neutral, PublicKeyToken=YourCompiledProvideDllPublicToken" connectionStringName="adconn" enableSearchMethods="true" attributeMapUsername="sAMAccountName" connectionUsername="YourDomainName\AdminUser" connectionPassword="Password" />

</providers>

</membership> - Open IIS click SharePoint Central Administration v4, click explore in the right-pane, open the web.config for edit
- In the system.web section add/update the membership section (don’t foreget to update the parts appear in green): [Here is also a demo of the role provider you may add. If you are not using it, you may skip the roleManager part]
<roleManager>

<providers>

<add name="MyRolePro" type="YourCompiledProviderNameSpace.YourCompiledProviderClass, YourCompiledProviderDll, Version=1.0.0.0, Culture=neutral, PublicKeyToken=YourCompiledProvideDllPublicToken" applicationName="MyRolePro" />

</providers>

</roleManager>

<membership>

<providers>

<add name="MyMembershipPro" applicationName="MyMembershipPro" type="YourCompiledProviderNameSpace.YourCompiledProviderClass, YourCompiledProviderDll, Version=1.0.0.0, Culture=neutral, PublicKeyToken=YourCompiledProvideDllPublicToken"

connectionStringName="LDAP://YourDomain.com/DC=YourDomain,DC=com" enableSearchMethods="true" attributeMapUsername="sAMAccountName" connectionUsername="YourDomain\AdminUser" connectionPassword="Password"

/>

</providers>

</membership> - Open IIS click SharePoint Web Services then choose SecurityTokenServiceApplication, click explore in the right-pane, open the web.config for edit
- Add in the system.web section a connection string . For example name it adconn (don’t foreget to update the parts appear in green):
<connectionStrings>

<add name="adconn" connectionString="LDAP://YourDomain.com/DC=YourDomain,DC=com" />

</connectionStrings> - In the system.web section add/update the membership section (don’t foreget to update the parts appear in green): [Here is also a demo of the role provider you may add. If you are not using it, you may ignore the roleManager part]
<membership>

<providers>

<add name="MyMembershipPro" applicationName="MyMembershipPro" type="YourCompiledProviderNameSpace.YourCompiledProviderClass, YourCompiledProviderDll, Version=1.0.0.0, Culture=neutral, PublicKeyToken=YourCompiledProvideDllPublicToken"

connectionStringName="adconn" enableSearchMethods="true" attributeMapUsername="sAMAccountName" connectionUsername="YourDomain\AdminUser" connectionPassword="Password"/>

</providers>

</membership>

<roleManager enabled="true">

<providers>

<add name="MyRolePro" type="YourCompiledProviderNameSpace.YourCompiledProviderClass, YourCompiledProviderDll, Version=1.0.0.0, Culture=neutral, PublicKeyToken=YourCompiledProvideDllPublicToken" applicationName="MyRolePro"/>

</providers>

</roleManager> - Restart your IIS
- Now browse to the URL you selected in step 2. you should get this screen:

Well done!


