How to set your first GIT repository?

  • How to set you first GIT repository?

(1) Go-to Git hub web-site at: Github Home Site and log-in (sign in or sign up)

git_e

(2) Click on the “New Repository

git1

(3) Enter “Repository name” and click “Create repository

git2

(4) You will be redirected to your Git-hub branch web-page.

Copy the URL link to the clipboard (ctrl + c)  for step 8

git_e3

(5) Create a folder on your computer for the Git branch.

i.e. create a GIT folder on drive c:     –  mk dir  C:\GIT

(6) Copy the desired files into the folder

These file will be uploaded to your web GIT branch

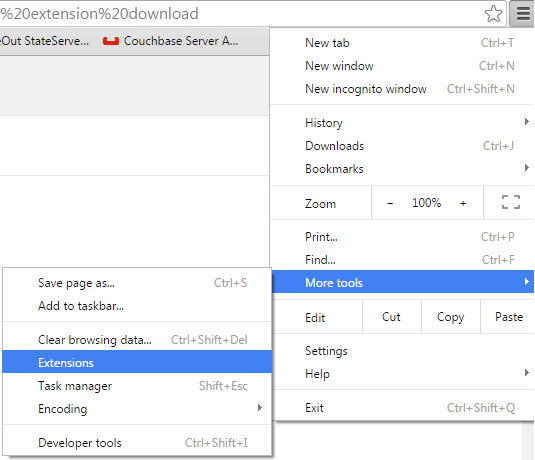
(7) Download GIT installer from the following URL:  Download GIT

git_e2

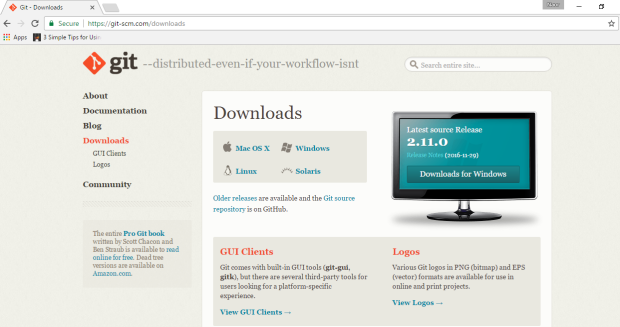
  • Execute the Git installer it should insatll git and extract git-bash.exe 

(8) Run the git-bash.exe  from the installed location

i.e.  C:\Program Files\git\git-bash.exe

1

After the bash command will open, Enter these command:

$ cd c:/git

$ git init

$ git add .

$ git commit -m “first commit”

-when copy paste this line make sure the quote sign is correct!!!

Then you may receive this:

git3

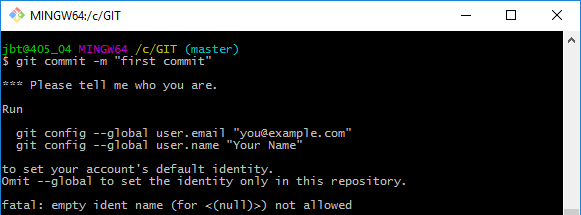
You should now enter you username and email (as you defined when you signed-up [ see step 1] ). for example:

git6

Now continue:

$ git remote add origin   URL-LINK [see step 4]

   for example:  $ git remote add origin https://github.com/itayhau/JavaTest.git

$ git push -u origin master

(9) Now browse to your URL-LINK [see step 4] and you should see the files (don’t forget to refresh! )

git_e4


To download the repository in the future,  just use

$ git clone URL-LINK [see step 4]

   for example:  $ git clone https://github.com/itayhau/JavaTest

🙂

Eclipse: Adding designer (window builder)

  • How to add a designer (windows builder) to Eclipse Neon?

Open the Eclipse Neon IDE
Goto Menu > Help > Install New Software…
In the “Work with” (see below) enter this URL: http://download.eclipse.org/windowbuilder/WB/integration/4.6/
(Taken from here: https://bugs.eclipse.org/bugs/show_bug.cgi?id=498276)
Click “Add” button, mark the check-box, and “Finish”

pic1

Now create a class which extends JFrame
i.e.

import javax.swing.JFrame;

public class myFrame extends JFrame {
public myFrame() {
}

}

Now right-click on this new class from the Package-Explorer and select “Open With” +  “WindowsBuilder Editor“. Then click on the Design button
pic2

Now you should get the Editor!

Good luck 🙂

InstallShield: How to read write delete registry key?

InstallShield: How to read write delete registry key?

Read from registry  (key value of  company_name):
function readFromRegistry(hMSI)
STRING isMajor;
STRING isMinor;
STRING netBios;
STRING szUninstallKey;
STRING szKey, szName, svValue, szMsg, strOurVersion;
STRING szNumName, szNumValue, svNumValue, TITLE, svTargetVer, szPropertyValue;
INT nvType, nvSize, nType, nSize, numSize, nResult;
begin
nvSize= 256;
REGDB_OPTIONS = REGDB_OPTIONS | REGDB_OPTION_WOW64_64KEY;
RegDBSetDefaultRoot(HKEY_LOCAL_MACHINE) ;
RegDBGetKeyValueEx(szKey, szName, nvType, svValue, nvSize);
if (RegDBGetKeyValueEx "SOFTWARE\\COMPANYNAME\\PRODUCTNAME",   "company_name", nvType, svNumValue,
nvSize) < 0) then
//Failed
else
//Success;
endif;
end;

Write to registry (i.e. only write during upgrade I_Am_Upgrading key with value “True”):
function WriteUpgradeRegistry(hMSI)
STRING isMajor;
STRING isMinor;
STRING netBios;
STRING szUninstallKey;
STRING szKey, szName, svValue, szMsg, strOurVersion;
STRING szNumName, szNumValue, svNumValue, TITLE, svTargetVer, szPropertyValue;
INT nvType, nvSize, nType, nSize, numSize, nResult;
begin
nvSize= 256;
MsiGetProperty(hMSI, "IS_MAJOR_UPGRADE", isMajor, nvSize);
MsiGetProperty(hMSI, "IS_MINOR_UPGRADE", isMinor, nvSize);
REGDB_OPTIONS = REGDB_OPTIONS | REGDB_OPTION_WOW64_64KEY;
RegDBSetDefaultRoot(HKEY_LOCAL_MACHINE) ;
RegDBGetKeyValueEx(szKey, szName, nvType, svValue, nvSize);
if(isMajor == "1" || isMinor == "1") then
if (RegDBSetKeyValueEx ("SOFTWARE\\COMPANYNAME\\PRODUCTNAME",   "I_Am_Upgrading",
REGDB_STRING, "True",-1) < 0) then
//Failed
else
//Success
endif;
endif;
end;

Remove Key from registry:
function RemoveRegistryKey(hMSI)
STRING isMajor;
STRING isMinor;
STRING netBios;
STRING szUninstallKey;
STRING szKey, szName, svValue, szMsg, strOurVersion;
STRING szNumName, szNumValue, svNumValue, TITLE, svTargetVer, szPropertyValue;
INT nvType, nvSize, nType, nSize, numSize, nResult;
begin
nvSize= 256;
REGDB_OPTIONS = REGDB_OPTIONS | REGDB_OPTION_WOW64_64KEY;
RegDBSetDefaultRoot(HKEY_LOCAL_MACHINE) ;
RegDBGetKeyValueEx(szKey, szName, nvType, svValue, nvSize);

if (RegDBDeleteValue (“SOFTWARE\\COMPANYNAME\\PRODUCTNAME”,   “I_Am_Upgrading”) < 0) then
//Failed
else
//Success
endif;
end;


InstallShield: Detect why my installer asks for restart

  • How do I detect why my installer asks for restart during execution?

Few suggestions:

  1. Run your installer with logs (from command line)
    YourInstaller.exe /debuglog"C:\PathToLog\myLogFile.log" /V"/L*v c:\PathToLog\myMSI.log"
    Open the log file and look for: (1)restart messages (2) [file-name] is being held in use… etc.
  2. Use WhyReboot tool: WhyReboot tool
  3. Look in the registry for other operations which cannot be performed during the installation and will be executed after the restart: RegistryKeysAfterRestart

Good luck…

MSBuild: error MSB4019: The imported project “C:\Microsoft.Cpp.Default.props” was not found. Confirm that the path in the declaration is correct, and that the file exists on disk.

  • How to fix this error on your automated build?

MSBuild: error MSB4019: The imported project "C:\Microsoft.Cpp.Default.props" was not found. Confirm that the path in the  declaration is correct, and that the file exists on disk.

This error appears usually when a project was created in a newer visual studio version than the one installed in your build machine  (using a different v… build tools). You can check your version by going into this path and looking for a v… folder:  C:\Program Files (x86)\MSBuild\Microsoft.Cpp\v4.0\.

For example, if the projects requires V120 and your build machine has v110 installed, do the following in order to fix the build:

  1.  On your MSBuild command add property VCTargetsPath with the correct path: /p:Configuration=Release /p:Platform=Win32 /t:Rebuild  /property:VCTargetsPath="C:\Program Files (x86)\MSBuild\Microsoft.Cpp\v4.0\v110"
  2.  Open your vcxporject and modify all of your PlatformToolset from v120 to v110:<PlatformToolset>v120</PlatformToolset> should be replaced with:  <PlatformToolset>v110</PlatformToolset>

Alternatively,  of course, you could install the correct Visual Studio version:

i.e.:

v110 (build tools) = require installation of Visual Studio 2012

v120 (build tools) = require installation of Visual Studio 2013


Android: How to add Google search item into your Webview

  • How to add google search item into your webview?


WebView myWV = (WebView)zActivity.findViewById(R.id.myWebView);
myWV.getSettings().setJavaScriptEnabled(true);

// Click on phone number inside web-view should open the dialer activity
myWV.setWebViewClient(new WebViewClient()
{
public void onRecievedError(WebView view, int errorCode, String description, String failingURL)
{
Toast.makeText(activity, description, Toast.LENGTH_SHORT).show();
}
@Override
public boolean shouldOverrideUrlLoading(WebView webview, String url)
{
if (url.startsWith("tel:") || url.startsWith("sms:") || url.startsWith("smsto:") || url.startsWith("mms:") || url.startsWith("mmsto:")) {
Intent intent = new Intent(Intent.ACTION_VIEW, Uri.parse(url));
myActivity.startActivity(intent);
return true;
}
return false;
}});

// mySearchString = whatever you want to search
myWV.loadUrl('http://www.google.com/search?q=' + mySearchString);

Cool graphs drawing tool for browser: PlantUML

  • How to draw cool graphs which is easily opened by the browser?

Answer: PlantUML

  • Go to your Chrome-options>  More tools> Extensions

plantuml

  • Now choose: Get more extensions

plant2

  • Now write: PlantUML and choose this viewer:

plant3

  • The simplest way is to open a new text file and fill it with your graph text (see example below), then open it with the Chrome (right-click, open with … Chrome).

@startuml
title My cool UML graph
autonumber
participant Browser
participant "second component"
participant third
Browser -> "second component" : Show this on the arrow
"second component" -> third : Now this
@enduml

Remark: there are also a lot more options you could use to enhance your graph… http://plantuml.com/